
Fermented Food for Beginners: Lacto-Fermented Vegetables
This is part 3 in a four part series. I renamed this series Fermented Food for Beginners in the hopes that it will encourage anyone who was intimidated about making their own ferments, as I was.
- Part 1: Introduction
- Part 2: Fermented Dairy
Before the advent of modern day canning most of our American fore mothers understood the process of lacto-fermentation. They had crocks of real sauerkraut, lacto-fermented cucumber pickles and other treasures such as beets, onions or garlic waiting out the winter in the root cellar.
Those countries with histories deeper than our own also traditionally fermented vegetables with simply salt, water and spices – knowing that the lactic acid produced would prevent the putrefication of these precious nutritional storehouses, keeping them fed through winter. Kimchi from Korea and cortido from Latin America are just two of the flavorful and delicious condiments not native to our own country.
When we lost touch with this food preservation technique we also lost touch with the unparalleled health benefits that came with them. Sally Fallon is a huge proponent of lacto-fermentation in her book Nourishing Traditions, and for good reason:
The proliferation of lactobacilli in fermented vegetables enhances their digestibility and increases vitamin levels. These beneficial organisms produce numerous helpful enzymes as well as antibiotic and anti carcinogenic substances. Their main by-product, lactic acid, not only keeps vegetables and fruits in a state of perfect preservation but also promotes the growth of healthy flora throughout the intestine.
After being completely overwhelmed by my first read through of Nourishing Traditions I waited months before making sauerkraut. The concept was foreign and intimidated me. Because I have grown up in a culture that thinks you have to pasteurize everything I wondered if I would poison my family.
If you are like I was – intimidated and a bit doubtful – then don’t be. You will know if a batch has gone bad. You will get used to, and even start to enjoy, the flavor of these healthful condiments. You will find that they are not much more difficult to assemble than a simple salad. You will actually want to keep a few jars/crocks on hand for health and flavor reasons.
To be honest I wasn’t wild about sauerkraut at first, nor the pickles that turned to mush. I found that I enjoyed bolder variations of sauerkraut such as kimchi and cortido. I also recently discovered how to make pickles keep their crunch a bit more – grape leaves. I’ve only tried one batch, adding the wild grape leaves from our own backyard, but they are crunchy and delicious instead of mushy and off-putting like my first few batches. It is the tannins in the grape leaves that are said to perform the delicious act.
So I would encourage you, if you were like me, to give lacto-fermentation a try. It is fairly simple, frugal and makes the most of your hard-earned real food. You can use whey as a starter culture in your brine, which Sally Fallon recommends in Nourishing Traditions.
I have not been using whey as of late and have yet to have a bad batch. I will leave you with two of my favorite flavors of lacto-fermented vegetables – cortido and dill pickles. I have come to love these little treasures so much that it makes it easy to eat them at two meals a day. Now all I need is that root cellar I dream of so that I can stock it full of giant crocks full of these tasty treasures.
Cortido
from Nourishing Traditions by Sally Fallon Recipe Notes: I sometimes leave out the carrots and halve the amount of onions. A struggle that I have is keeping the vegetables below the liquid level. I have yet to have a bad batch, but this can cause mold. One thing that I am considering purchasing from here is an airlock setup that allows the fermentation gases to escape while keeping air out. You can also purchase ready-made lacto-fermented vegetables here.
- 1 large cabbage, cored and shredded
- 1 cup carrots, grated
- 2 medium onions, quartered lengthwise and very finely sliced
- 1 tablesoon dried oregano
- 1/4 – 1/2 teaspoon red pepper flakes
- 1 tablespoon sea salt
- 4 tablespoons whey (if not available, use an additional 1 tablespoon salt)
- In a large bowl mix cabbage with carrots, onions, oregano, red chile flakes, sea salt and whey.
- Pound with a wooden pounder or a meat hammer for abou 10 minutes to release juices.
- Place in 2 quart-sized, wide mouth mason jars and press down firmly with a pounder or meat hammer until juices come to the top of the cabbage. The top of the cabbage mixture should be at least 1 inch below the top of the jars.
- Cover tightly and keep at room temperature for about 3 days before transferring to cold storage.
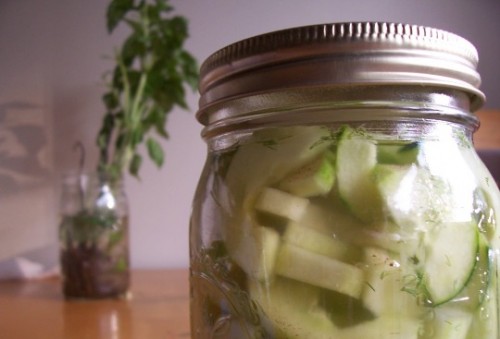
Pickled Cucumbers
from Nourishing Traditions by Sally Fallon Recipe Notes: For pickle slices simply cut cucumbers into 1/4 inch slice and cut back the fermentation time to 2 days instead of 3. A struggle that I have is keeping the vegetables below the liquid level. I have yet to have a bad batch, but this can cause mold. One thing that I am considering purchasing from here is an airlock setup that allows the fermentation gases to escape while keeping air out.
- 4-5 pickling cucumbers or 15-20 gherkins
- 1 tablespoon mustard seeds
- 2 tablespoons fresh dill, snipped
- 1 tablespoon sea salt
- 4 tablespoons whey (if not available, use an additional 1 tablespoon salt)
- 1 cup filtered water
- Wash cucumbers well and place in a quart-sized wide mouth jar.
- Combine remaining ingredients and pour over cucumbers, adding more water if necessary to cover the cucumbers. The top of the liquid should be at least 1 inch below the top of the jar.
- Cover tightly and keep and keep at room temperature for about 3 days before transferring to cold storage.
********** I also wanted to pass along a link to a great article Alyss wrote: Of Probiotics & Pickles.
So what about you… have you made any of these lacto-fermented vegetables? Which one is your favorite?
This post is a contribution to the In-Season Recipe Swap.
Industrial pickling is not the same as fermenting or home pickling.
I love making fermented foods. What I like to do to keep the veggies under the liquid is to ball up extra grape leaves and push them down on top of whatever is in the jar. I keep adding salt water until it overflows and make sure as I screw the lid down the brine is leaking out from the lid. I shake mine up to get as much air out of the jar as possible and then redo this process as needed just adding the brine and putting the lid back on until I see very little or no air bubbles. Oxygen is what causes food to spoil so if you can remove as many pockets of air in the jar and add brine to the top you will always have good success! Press down on the lids once sealed and check every few hours. You can tell its fermenting when you start to feel resistance on the top of the lid, then just burp it a bit and keep doing this for a couple days. Throw them in the fridge and the fermentation will slow way down keeping your veggies nice and safe! I’ve made literally dozens and dozens of jars of everything from beans, cucumbers, carrots, asparagus, beets, radishes, etc. I’ve personally never had a bad batch. I use old pickle jars, canning jars with the two part lids or anything else with a nice tight seal. Good luck out there!
Thank you for posting these recipes. I have been wanting to make some fomented veggies for ages. joanna UK.
To keep your food below the liquid level, top your jar off with glass marbles.
These are awesome tips! I love to ferment things, but I haven’t been doing it super long and I still sometimes get intimidated with certain projects. I’ve really found reading other people’s experiences and watching how-to videos to be so helpful!
Don’t spend a lot of money to keep your veggies from floating. Fill a gallon-sized ziplock bag with water and put it on top. It will keep your veggies below the float line.
Also, you can use cherry, oak, or currant leaves to keep the pickles crunchy. I always harvest and dry a few currant leaves to keep handy for pickling.
I have just begun fermenting super-hot chiles for hot sauce. I am using a 1-gallon glass jar with a hole/grommet in the lid to hold a (beer/wine) airlock. I have come up with a simple solution to keep the chiles under the brine.
Once my jar is filled, I press, or crush down the fruit to make sure it can physically remain below the brine (crushed down so 1/4 top of jar is air.) Then I add the brine to cover all.
Finally, I add a sanitized plastic yogurt lid above the fruit. It is fairly large diameter, and I have to bend it into the fermenter. I place a sanitized ramican on top of the yogurt lid, open end up. The airlock tube sticks down from the lid into the empty ramican to remain out of the brine to exhaust CO2. The ramican under the fermenter lid, pushes the yogurt lid down, thus submerging the fruit. The only drawback I have found is that the CO2 ends up pushing a bit of the fruit up around the edges out of the brine.
I hope this can help. Eat living Food!
David – Thanks so much for sharing that! I love hearing about everyone’s fermentation setups. 🙂